Most WebMasters have heard of Firefox… the alternative Web Browser that’s giving Microsoft a run for their money. Some know about the wonderful list of “extensions” available for it including Web Developer programs. This article is for those of you who want to learn how to deploy a mighty Fox armed to the teeth with Web Developer tools, plus learn ways to use them to help analyze and learn CSS, manage websites, and take your skills to the next level.
What Do You Need?
You can get going right now. First, you need to download FireFox for your OS (Linux, Mac, or WIN. Current version 1.5.) at GetFireFox.com. Then go to the Firefox “extensions” site (see http://addons.mozilla.org) and load the following extensions: FireFTP (to manage file transfers from within FireFox), and Web Developer 1.0 (a suite of “must-have” web developer tools including Validators, CSS Editing and Viewing, Forms Management, and Image Controls). Follow the directions for installing the extensions — quite simple… you just download them, then restart FireFox.
Six WebMaster Tricks in FireFox
We’re calling them “tricks”, but these tools are actually mini-applications which you may use to analyze, edit, and manage web projects. We’ll look at them in that order, learning three ways to analyze website layouts, followed by two ways to edit your websites, and finish with an ftp site management tool.
Analyzing Sites: Three Ways to Understand Web Page Structure…

We’ll analyze the structure of this CSS/HTML Template from PickleZone.com, with our Firefox Tools.
We’ll take a look at the same web template (a CSS based template with both an HTML page, and external StyleSheet from the Download of the Month at PickleZone.com, three different ways, using our new Firefox tools to understand the HTML structure, the CSS element blocks, and the Image Dimensions and File Sizes. I’ve found these steps to be highly helpful when looking at a new client’s website for the first time, while trouble-shooting an existing site, and when using a new page template.
Trick 1) For our first look at the template’s structure, we’ll “VIEW: Rendered Source Chart”, to see a helpful color-coded and block box hierarchy of the HTML page code.

Above, you can see that we’ve opened a “Rendered Source Chart” for our template using the extension, which when loaded, places this menu option under “View.” At the top of the Chart, you can see that the page refers to an external style sheet titled, “fall.css.” Each “div” container becomes a boxed area in the Chart, an unordered list (ul) appearing in green.
We can begin to see from the chart that is generated, how it isolates different DIV sections, and other CSS elements in color-coded sections to help us visualize the page structure. Let’s have a closer look at more of the charting:
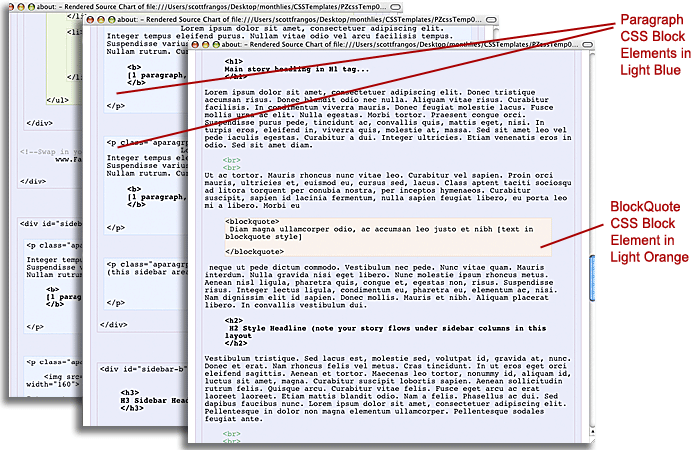
Above are a series of three screens, captured when scrolling down in the chart. Note that paragraph sections are shown in a lighter blue background, since they are designated a block element in CSS, but that where text is broken by two line breaks (two BR codes), there is no different chart color background.
In the series of three screens above, seen while scrolling through the “chart”, you can see that for a BLOCKQUOTE section, the background is a light orange/red. This tool simply helps you pick out different CSS block elements, in your HTML code quickly and visually.
Trick 2) Next, let’s take a look at the same template using the Web Developer set of Tools (by Chris Pederick — by all means, visit his site — ChrisPederick.com — and make a donation to thank him for an outstanding set of WebMaster tools) to “Outline” CSS Block level elements, and turn on their ID and CLASS names, which show up on the page in yellow tag boxes (see illustration below), using the “Information” tool:
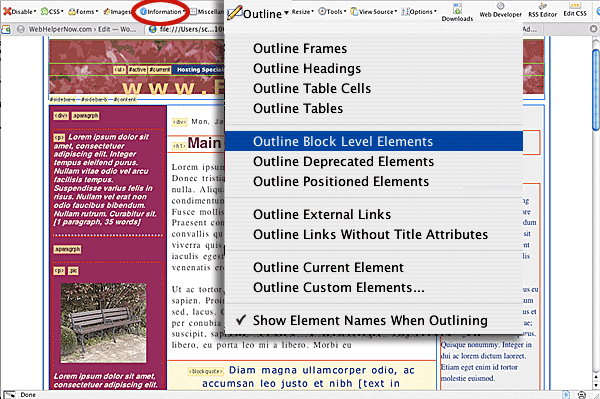
Above, we used the “Outline Block Level Elements” option from the Web Tools Toolbar (also available under the main Firefox menu “Tools”) to turn on outlines around the CSS blocks. Red lines appear around Paragraphs and Headings, with blue lines around DIVS, and green lines around the UL section at top of page. We also are viewing the ID and Class labels using the “Information” menu (circled in red).
This is an excellent method to find out about the CSS placement elements used for a web page layout. You can quickly determine that the right column in the template is created using a DIV named “sidebar-b”. Using the Outlining options, you may also like to outline Table Cells (no tables used in this template), deprecated elements, Frames, & Headings to get a still better sense of how a page is structured. Think of this as a method to take an X-ray of the skeleton of your pages. I use this method (Outline Block Level Elements and see ID and Class information) to analyze and troubleshoot a Style Sheet, while the first method (viewing a “Source Chart”) helps me understand an HTML layout better.
Trick 3) Our last analysis of page content will be with the Web Developer “Images” options, as shown below:
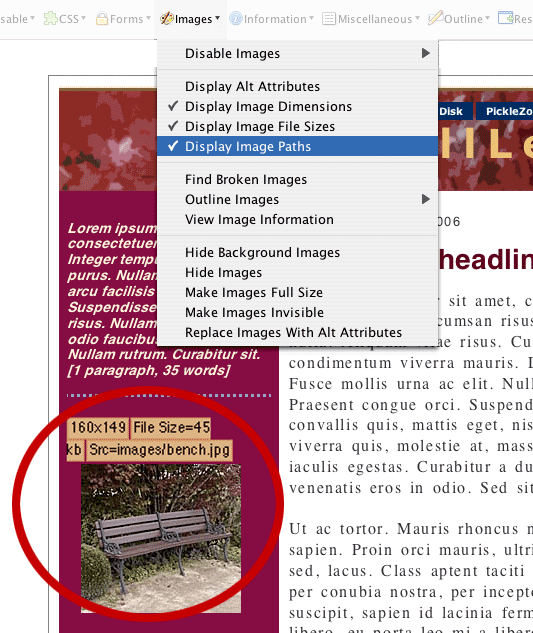
Above, we’ve turned on the Dimensions, Files Size, and Paths for Images, and can see the resulting data for the Bench Photo displayed above it (circled).
Two Ways to Edit Your Websites…
So your Fox can help you analyze structure… but can it edit? Let’s take a look at two excellent ways to edit using your new Firefox extensions — for both HTML and CSS. These are our fourth and fifth Firefox “tricks”, which again are actually mini applications built into the extensions you installed.
Trick 4) HTML Editing with your Web Developer Tools. Most WebMasters I know, already have tried several HTML editors and selected a favorite. So why take a look at this HTML editor. FOUR reasons: the HTML editing window opens and instantly updates when you surf from site to site for easy code referencing; you can use this editor in collaboration with the analysis tools already discussed, without opening another program; you can try changes to any website and instantly see and consider the result without permanently changing the code… while you surf; and you could use this free editor in a pinch when you’re away from your office.
Take a look:
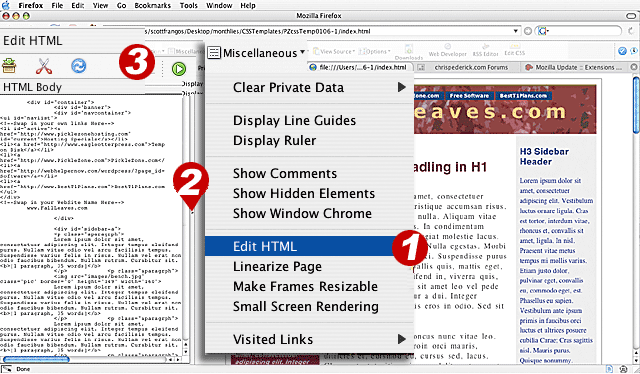
Above, the HTML editor from your Web Developer tools is shown open. 1 – Open the editor under the Miscellaneous Menu. 2 – Widen your editing window for easier viewing by clicking and dragging the midpoint “handle” (a small dot) to the right. 3 – Use the three icons at top to get your work done… left to right, they are Save, Clear, and Reset All. Note that there is also a Green Arrow at the top right of the editing window that will Apply your changes to the page you are viewing in the browser.
With this little editor, there’s no need to open a separate program — even NotePad — to work on your pages. And, unlike NotePad, you can edit and troubleshoot web pages instantly — even pages and sites on a remote server!
TIP: Imagine the power of this little HTML editor when you visit a prospective client in their office and can visually show them your ability to make desirable changes to their website without having access to their webserver (until they hire you).
Trick 5) CSS Editing with your Web Developer Tools. I really like this CSS Editor, not because there aren’t more fully featured editors out there, but because I can go to any website online, open the Editor and make a change to the CSS and immediately view the results. What a great way to learn the secrets of CSS. Let’s take a look at the editor:
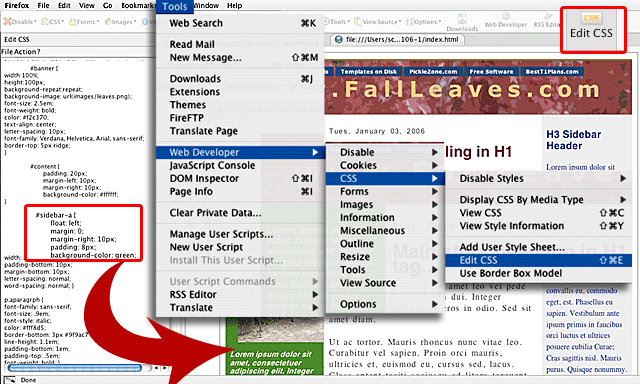
Above, the CSS Editor is open, which you may access under the pop out menus under the Tools menu, or by simply clicking the “Edit CSS” icon outlined in red at far right on the toolbar. The large red arrow shows how the right column changed (almost instantly) to green after the appropriate code change (outlined in red).
Managing Your Websites With FireFTP…
So now you can size things up, and make some editing changes… what’s next?
Trick 6) We’ll close with an overview of FireFTP… a way to get your web page files to your web server. If you’ve not used an FTP (File Transport Protocol) program before, they can be very helpful moving a number of larger files from your computer to a distant web hosting server. FTP programs open a directory list on your own computer so you can find the files you wish to move. Then the program connects with and displays a directory window on the remote machine (usually a web server). You can just move files from one window to the other and watch their progress. Let’s take a look at FireFTP:
Above, you can see two directories, side by side, in FireFTP. The window on the left shows files on the “local disk” (usually your hard drive), while the one on the list is connected to a remote web server. 1 – We clicked on “Manage Accounts” in upper left, and chose “Quick Connect.” 2 – You type in the web location where the remote server is, then the Login Name (sometimes called User Name), and your Password. 3 – Once the directory on the remote server opens, you can transfer files from one location to another by just clicking on the file name, then clicking the appropriate green transfer arrow. 4 – You can watch the progress of the transfer process in the window at the bottom of your screen.
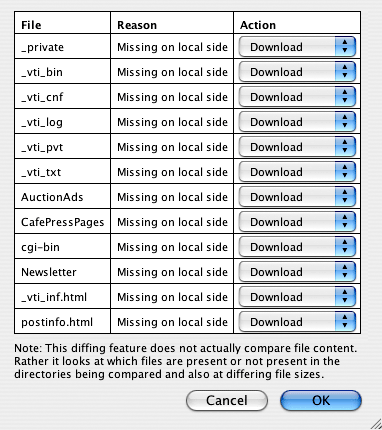
The above screenshot and process explanation give you a general overview of how to start managing your FTP needs with FireFTP. This extension does offer a couple of advanced management functions you should explore, including the ability to set up a list of standard accounts with which you regularly connect (under “Manage Accounts”), and a helpful “Directory Diff” feature (under the “Advanced” menu at top right) which compares both open directories and lists files missing from the local or remote location with buttons for downloading or uploading them (shown right).
Now that your Firefox is trained properly, you can analyze, edit, and manage your websites with it. Note that there are a number of other extensions you may wish to test including an RSS editor, page translators, and other helpful tools. These tools for the foxy webmaster are now at your disposal, free, and on an upgrade path.
by Scott Frangos