![]()
(In this lesson you will review several methods for optimizing graphics for use online.)
Learn how to create a left bar background tile for your web page. This lesson will teach you how to create a side border bar which might be used in your design as an area in which to place buttons.
1. Open Photoshop.
2. Open a new file that is 121 x 1400 pixels in size (you need the extra width, since this image will tile in the background of a web page, and modern monitors will display more than 640 pixels in width on screen).
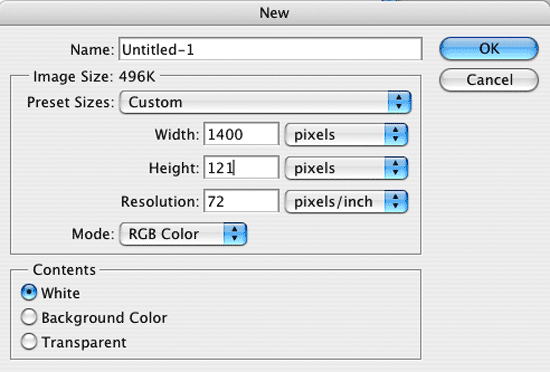
Make sure you set the Width and Height for Pixels, then type in the numbers shown: width 1400 pixels, height 121 pixels, and resolution at 72 pixels per inch.
3. Create a new layer and name it “left border”.
4. Use the rectangular marquee to select an area at the left side of the image that is approximately 130 pixels wide. You can use your rulers set to read in pixels to measure this. As the web page designer, it will be your choice whether to make this left border area 120, 130, 140 pixels or wider. Remember that if you intend to fit buttons in this area, that they will have to be slightly smaller in width, and this will determine how large your type on the buttons can be set.
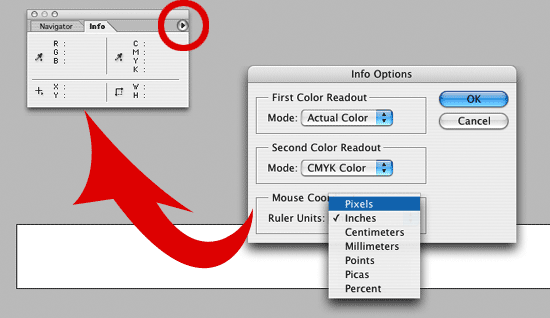
You can use the Info Palette to guide you in determining the width and height of a selection. First click the small black triangle at upper right of Palette (circled in red) to open the Palette options box — shown open above. Then set the Rule Units to pixels (highlighted above). When you use the Rectangular Selection Marquee, the width and height will show in the Info Palette (next to the “W:” and “H:”).
Adding Buttons: There are two ways to add buttons so they appear “on top” of this sort of background — using tables to control placement of the buttons, or using CSS. We recommend you learn how to control placement using CSS, since as this is written the W3C.org web standards are releasing CSS version 3, and support for version 2 is almost universal on up to date browsers. You have much more design control with CSS, and will create more effective, and efficient pages.
5. Fill this side area with a color of your choice. Since a lot of your web page elements are blue, you will want to choose a color compatible with blue (see note under next illustration below).
6. If you want to use a filter to add texture to this layer, you will first use the add noise filter again to break up the pixels. After doing so, select the filter of your choice (try the Cutout Filter for a nice effect — as shown below), to get the effect you want.

Above, the sequence was first to choose a color by clicking on it in the Swatches palette (note: we chose a “Complimentary” color using Color Theory… see our article on Web Design). Next, the Paint Bucket tool was used to fill the selected area with the gold/tan color. Noise was added to the color to add some range (results in a grainy look as shown where the red arrow is pointing). Finally, the Cutout Filter is shown transforming the selected area into a more pleasing pattern.
7. Now create a drop shadow for this layer using layer styles. Note that within layer styles you could also use settings there to apply gradients and textures. Set the drop shadow angle to 180¡ so the shadow has no break at the right side.
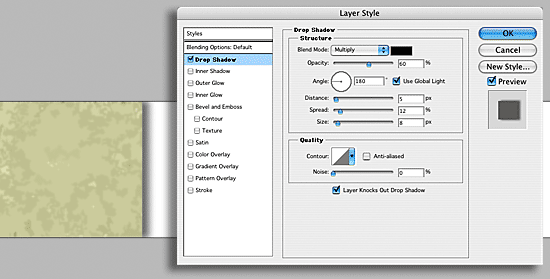
You create a background using Layer Styles.
8. Save the entire document as a PSD (Photoshop Document) to preserve the layers and effects — name it leftBkgnds.psd. Then, flatten the image. Next, crop your new side border using the crop tool, so that the width remains the same, but both the top and bottom are cropped in a few pixels as shown below. This eliminates a tiling problem with the shadow top and bottom edge where it fades a bit — if you did not crop it like this, then when your background “tiles” (repeats) in a web page, there would be a slight indented shadow in between each tile.
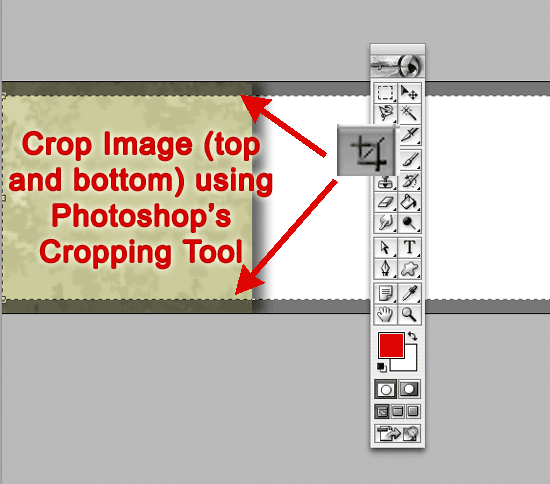
Above, the crop tool is used to crop the top and bottom of the image to remove the slight indentation in the layer shadow at top and bottom — after the image is flattened (command under the Layer menu).
9. Save for Web, and consider your format options using 4-up view to compare them as shown. We like the PNG format or all files other than photographs (for which we use JPEG). Here, the download times are all 2 seconds, and the quality does not differ, so any of the formats will do for our purposes. Name it leftbkgrnd1.png (or. jpg if you choose jpeg format, etc.), and save it into the “images” folder inside your “website” folder that you created earlier. This keeps your files organized for use on a web hosting server.

Above, the PNG-8 option is shown along with 2 other choices.
10. Close the document.
11. Now open the file you just saved using Save For Web. Choose select all, and then Define Pattern. Name the Pattern VicLeftBkgnd1.
12. Finally, open your HomePage1design.psd master file and create a new layer beneath the layer with the browser window in it. Fill that layer with the side bar background pattern you just created. Save the file. Note that you can now alternate between backgrounds (this new left background, and the background tile you made previously) to see which will look better for your design. Do this by clicking the layer visibility icon (eyeball) on or off for the tile and side bar layers.
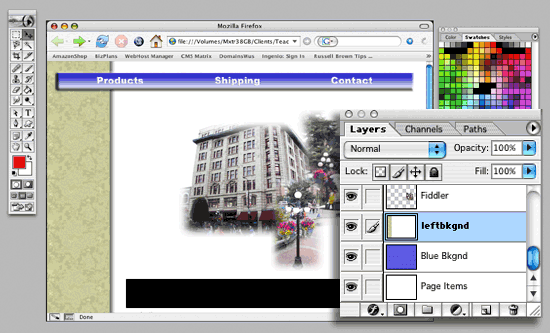
Above, the new left border background has been added to your homepage mock-up by creating a new layer named “leftbkgnd” (see it in Layer Palette above), then filling it with the background which you created as a pattern.
How is this pattern used in a real web page? Recall that you saved a separate file containing the new left background palette as “leftbkgrnd1.png” in step 9, above. To insert it into an HTML page, you open your HTML editing program, and in the “body” tag, add background="images/leftbkgrnd1.png". Note that you use “images” to locate the file because that is the directory in which you saved it.
13. Save your changes.
Next Art For Web Tutorial: Creating an Animated Banner
by Scott Frangos