(In this Lesson you will create a small duplicate image for use as a “thumbnail” image, which when clicked opens a larger version of the image.)
1. Open Photoshop.
2. Open the file “picture.jpg” (it is available for download in Lesson 1).
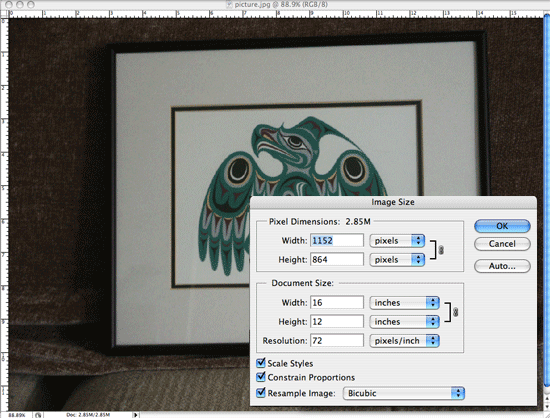
Above, two ways to verify the actual size of an image are displayed — rulers are turned on (View menu), and Image Size dialog box is shown. Both confirm the width of this photo starts out at 16 inches wide — too large to fit on a web page. This shot was taken with a 3 Megapixel camera. Images shot with cameras with more megapixels may be much larger, initially.
3. First, lighten the image using Curves, since it is too dark, and by lightening it, you will be able to see the edges of the black frame much better.
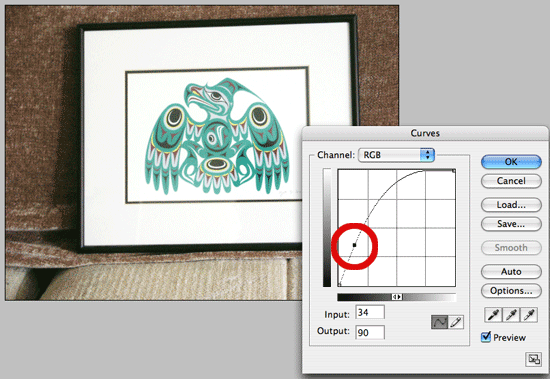
Above, the Curves dialog box is shown with the image corrected by lightening the middle tones of this over exposed photo. You lighten the middle tones by clicking down on the diagonal line in the box (start about a quarter of the way from the bottom left — circled in red above), and dragging it upward, to create a curve that lightens the image.
TIP: Curves or Levels? While you could lighten the image using Levels, we recommend you learn to use Curves, as the changes you make will remove less information from your image, preserving all the image data and details in dark and light areas.
4. Next, correct the image by cropping, then adjusting perspective. Be sure to crop it to the edge of the picture frame, but not to cut off any parts of the frame. Use the Polygonal Lasso Tool to select in straight lines around the outside of the frame. Correct perspective using Free Transform (Edit Menu), and Control-Clicking (Command-Click on a Mac) the corners to drag and correct distortion.
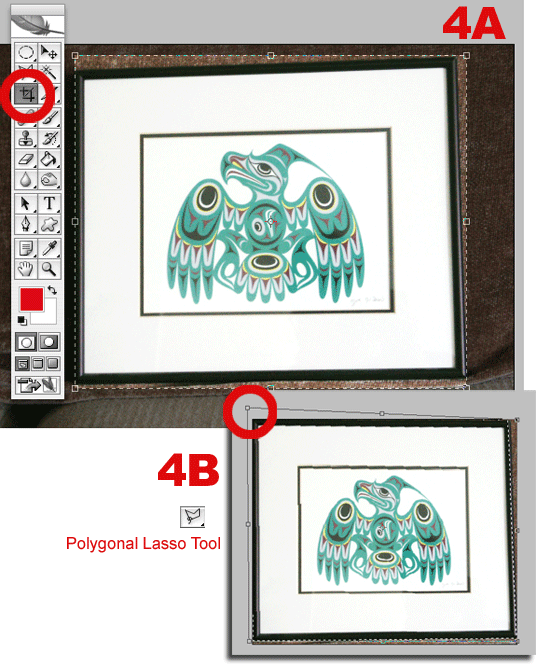
Above, in 4A, the Crop tool is used to crop in close to the image, taking care not to crop out the black frame. In 4B, the Polygonal Selection tool was used to select straight lines outside the frame, then by Control-clicking, and dragging the corners, you can correct the distorted perspective to make the picture edges perpendicular.
5. Make the image width smaller (stay at the maximum width that you would want to show it on your site — 500 pixels is good). Save it using Save for Web, JPEG format, into your images folder as “PictureLarge.jpg”
6. Now prepare your “thumbnail” version of the same image by sizing it down to 120 pixels wide, and again saving it for web. You’re preparing this small version, so that when someone clicks on it, you can link it to the larger version you saved in the previous step.
7. In Save for Web, and this time examine GIF options compared to PNG options, in the 4-up Tab view. Note that in the latest versions of Photoshop (CS series) you can use the “Image Size” tab (circled in red below) to change the file size of the image when saving — this does not affect the size of the original file.
8. In the Save for Web dialog box, set the upper right preview to GIF, 256 colors, the lower left to PNG 256 colors, and the lower right to GIF 16 colors (remember to click on each image box first — that is how you select them prior to changing settings). Make sure Diffusion Dither is on at 100% – this will rearrange the color pixels so the image looks better in gradient areas.
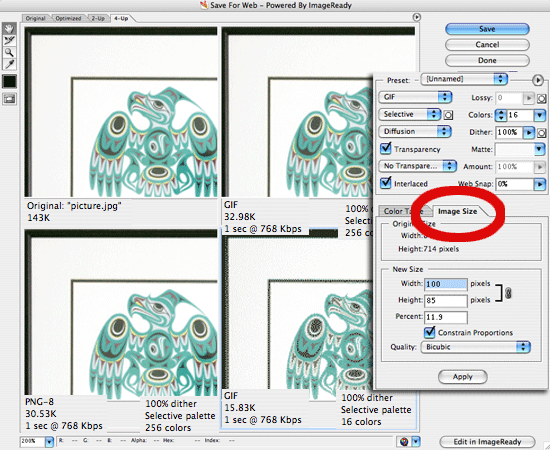
Above, see how you can use the 4-up view in “Save for Web” to compare the original (upper left) to three other file types and resolutions. While the lower right at 16 colors, does produce a much smaller file size (15.83k), it makes the image look very grainey because of the reduction in colors used to produce it. Would be more inclined to choose the second option (lower right) — the PNG format which produces a fine looking image at a slightly smaller file size (30.53k) than the GIF version at upper right.
9. Save your best choice as a compromise between download speed and picture integrity, and save it as “picturethumb.gif”. On a page with a lot of thumbnails, the smaller you can make your images (file size) the better — even at faster broadband speeds.
TIP: GIF or JPEG? This is a good question. You can create small thumbnails in JPEG format too, but a GIF can be animated, while a JPG cannot. We are using GIF as the format for this exercise so the file could be animated later if you choose. Since you have retained the larger version of the image, you could also go back and save a small version in JPG format later.
10. Copy & Paste the new thumbnail image and the “HomePage1design.psd” file. Place the new small image into the lower right of the “HomePage1design.psd” image using your favorite method. It will become an advertisement on the homepage for a sale on artwork.
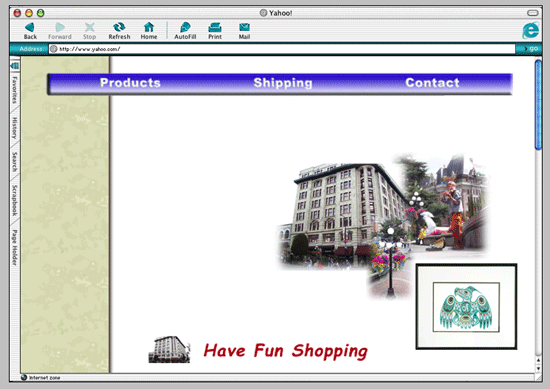
Above, your “thumbnail” image has been placed into position beneath the collage. Once the page is coded, you could click on it to see and purchase the larger image. Note that positioning for it on this home-page mock up is entirely up to your sense of design. You might like to rotate it a bit (use the free transform tool), for example.
11. Save “HomePage1design.psd”.
About the Author: Scott Frangos is a web developer, college instructor and graphic designer. He is Managing Editor for WebHelperMagazine, and is also writing two forthcoming books for Web Masters. He lives in Portland, Oregon with wife and partner, Pepper, and their three dogs: Wisdom, Spirit, & Steggman. © 2007. All rights reserved.
Next Art For Web Tutorial: We will conclude this tutorial series in Lesson 8, where we’ll learn to set stylized type for headlines on our web page.