(Learn how to create a navigation button bar for a website In this lesson you will take a picture of a web browser screen to use as a template, then make a navigation bar for your website.)
1. Open Photoshop.
2. Create a browser template by opening FireFox (we prefer it for Web Development), Navigator, or Internet Explorer, and doing a “Print Screen” (command-shift-3 on a Mac) and then open it into Photoshop. Note that there is an extension for FireFox that automates screen shots for you called “Snapper”, available for Windows and Mac OS (get it here: https://addons.mozilla.org/firefox/2703/). Photoshop makes a new document with this template as the bottom layer. Next, crop the image to the edges of the browser window.
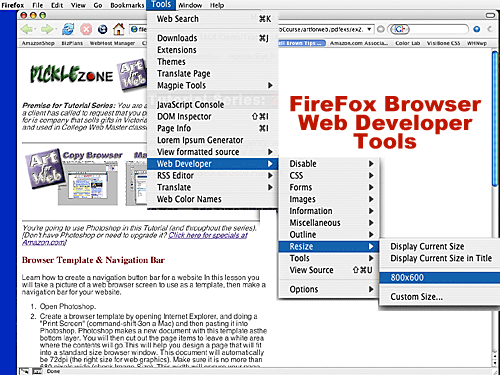
Above, the FireFox Browser is shown with the “Web Developer” Tools extension (http://chrispederick.com/work/webdeveloper) used to change the size of the Browser window to 800 x 600 pixels. Note that the Custom setting on the same menu allows you to specify different screen sizes. The size you capture in your browser will also be the size in your Photoshop document, and we are using 800 x 600 as a standard browser window size.
3. Cut out the page items, by selecting, then deleting items in the main browser window area, to leave a white area where the contents will go. This will help you design a page that will fit into a standard size browser window. This document will automatically be 72dpi (the right size for web graphics). Make sure the document is no more than 800 pixels wide (check Image Size). This width will ensure your page design will fit on “one screen” of smaller monitors, without the user having to scroll to the right.
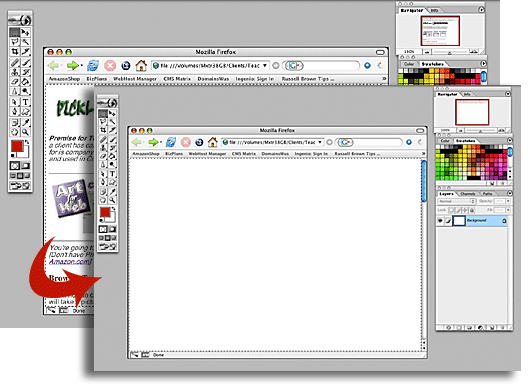
Above, the screenshot is shown in Photoshop, after it is pasted in a new document and cropped with the cropping tool to the edges of the Browser window. Then the items in the browser window are shown removed after using the Rectangular Marquee Tool to select the window area and delete (strike delete key), to clear that space for your web page design.
4. Turn on your gridlines under the View menu – these will help you align your web page items (Note that you can adjust the width under the Preferences controls).

Above view shows Grid turned on to aid in lining up items you’ll create for your web page.
5. Create a new layer, and name it “Navigation Bar”. Turn on your Rulers, under the View Menu. Now, create a navigation bar across the top window area by first making a selection with the rectangular marquee that is 1/2 inch high and extends within a quarter inch of the browser edge on both sides. Select a color and fill that selected area (illustration shows blue color used).
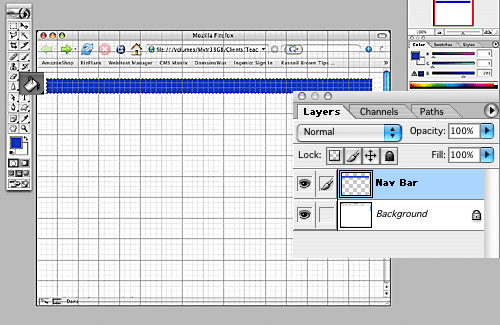
Above, the blue Navigation Bar in a new layer (you should name each layer — double-click on its name and type a precise label for it), was created by first making a selection rectangle, then filling it with blue using the Paint Bucket tool.
6. With the navigation bar selected (you may command-click the layer for that bar to select the image in that layer), experiment with the gradient fill tool to achieve different color blends for your bar.
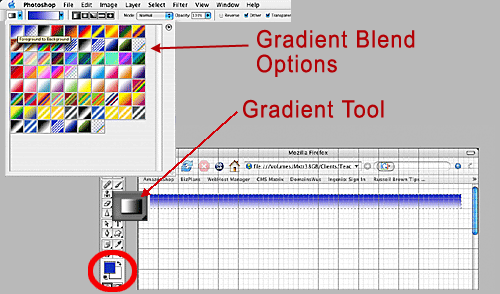
Above, a graduated bar effect has been created using the Gradient Tool (shown large – middle), with a blend from the Foreground Color to the Background Color (blue to white — Foreground and Background color boxes are circled in red at bottom). Top pop-down shows other Gradient options available on the Tool Options bar (options for each tool selected become available on this bar, which is located just under the top main menus).
7. Once you have created your navigation bar, you emboss a copy of it to add depth. You will retain the first bar in a duplicate layer for optional use later. Duplicate the bar layer. Choose Emboss from the pop-up menu at bottom left of the Layers Palette. Adjust the emboss settings until you are satisfied with a raised look for your navigation bar, as shown below.
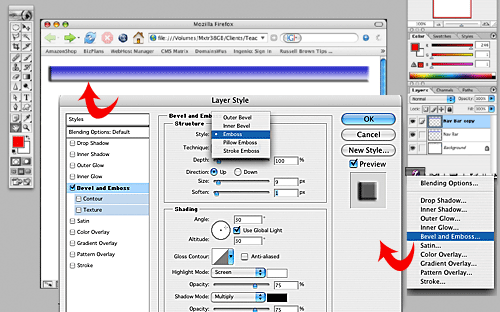
Above, the Nav Bar layer was first duplicated (note three layers appear in Layers Palette now), then the Layer Style pop-up menu was activated by clicking on the small “f” icon on right at bottom of Layers Palette. “Emboss” was then chosen from the Style pop-up menu, and size and soften settings were selected. The result is a raised look for your Navigation Bar. The grid has been turned off so you can see the bar clearly in this example.
Note on Making Good Design Choices: Always keep in mind your creative goals, from the perspective of your website users, when making style choices. For example, here your goal is to make an attractive and usable navigation bar for a website, so let that guide you as you work with the hundreds of choices that Photoshop provides. “Attractive” means here, among other things, that the color chosen does not clash with other items on the page, but instead coordinates in a pleasing way. “Usable” means that your web visitors can easily discern where the navigation features are and how to use them.
8. Now it is time to add type to your navigation bar. Select the type tool (letter T in toolbar) and pick an appropriate font and size. Start with White for the color of these words by changing the foreground color to White (you can change color later to match a color scheme for your page). Type the words “Products”, “Shipping”, and “Contact” across your navigation bar, making sure to space them uniformly by watching your grid.
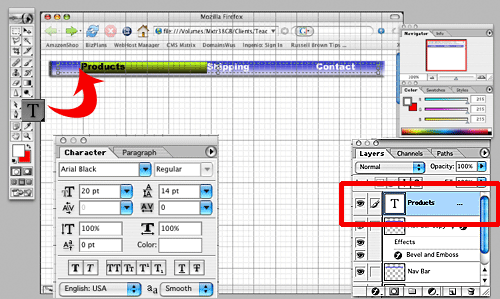
Above illustration shows the type for your Nav Bar created with the Text Tool (the first word looks green, because it is highlighted to make changes — the highlight disappears when you click to another tool). The Character Palette is shown, which is a good way to edit your type. At right the new layer, created when you use the Type tool, is outlined in Red.
9. Next you will emboss the type the same way you did for the bar, using the Layer Styles, but you can experiment some with the emboss controls. Try different embossing methods and settings until the type looks like it is part of the bar. Try “Inner Bevel”, Technique: Chisel Soft; Depth:51%; Size:4, Soften:2.
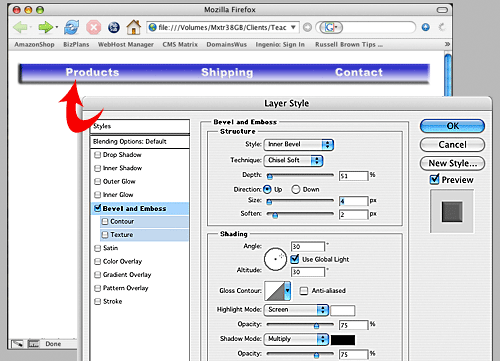
Make sure you have clicked on the Text layer first, before opening layer effects. Then, you can make the selections described above to give your type an embossed effect on the navigation bar.
10. Finish by double clicking your background layer to name it “Browser”. Use the selection tool to remove the white area in the Browser window. Make a new layer beneath it and fill it with white. Call that layer “Page Items.”
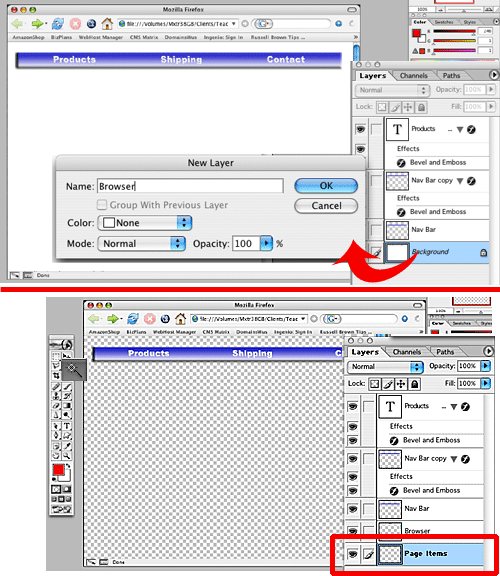
Above two illustrations show first the background layer being renamed “Browser” (top), then a new layer created and moved underneath it, named “Page Items” (lower illustration – outlined in Red). The Magic Wand selection tool (enlarged in bottom illustration) was used to select the white area of the Browser window and then was deleted (showing grey squares) by striking the Delete key. Grey squares (they will not appear in print-outs) in Photoshop indicate a transparent area on a layer, showing through items in layers underneath.
11. Save the finished file as “HomePage1design.psd” in your “website” folder. You save it as a PSD to retain the layers for the template, navigation bar, type, and more layers you will add in later exercises.
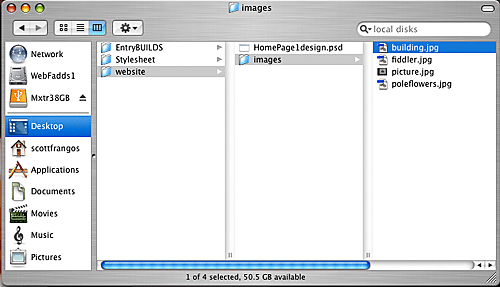
Above illustration shows the “Website” folder, here on the Desktop (Mac System). It is important to keep your work in its own folder, not only for efficiency in organization, but also for when you move your website files to a web hosting server — the server looks for links from HTML pages to images in precise folder locations.
Next Art For Web Tutorial: Creating a Home Page Collageby Scott Frangos