(You will create a collage graphic using the grid and 3-4 images In this lesson, you will create a home page collage by combining images you import and and blend together using layer modes and opacity settings.)
1. Open the 3 images you saved in exercise 1 so you may combine them for a collage. Note that you might like to open them all, then zoom out to make them smaller. You will be able to see them all on screen, and consider how they might work together nicely.
REMEMBER: When several document windows are open at once in Photoshop, it can make your screen cluttered, and you might lose a picture that is open behind another picture that is open. To avoid this, you can zoom the size of each image down to create smaller, more easily managed windows.
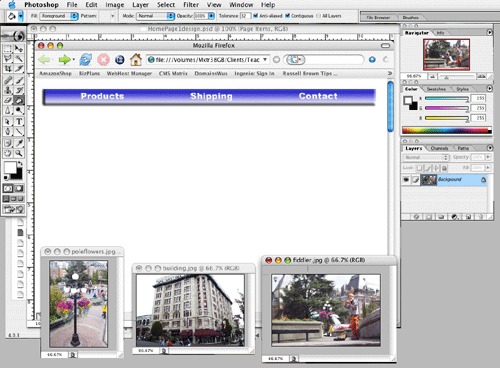
2. Open your HomePage1design.psd file and open and place each of the images you saved to disk into it using your favorite method of combining graphics into one document.
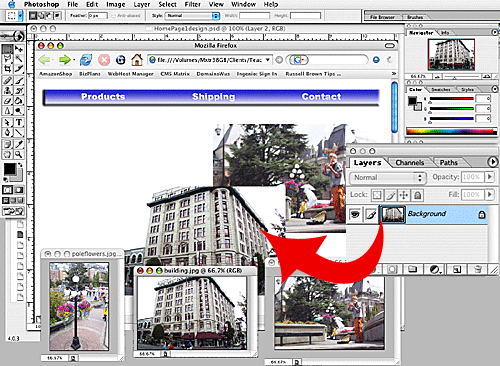
You can copy graphics from one open widow to another by dragging its layer name from the layer palette over the destination window, then releasing the mouse. The image will appear in a new layer in the target document. Name the layer for each image you copy in, and resize them as needed using the Free Transform tool.
3. Placeholder to allow for other page elements: Create a placeholder graphic that is 468 pixels wide by 60 pixels tall in a new layer. This is a standard web banner size. A fast way to do this is to create a new document set at that size and simply fill it with black and copy it to your master document. You are simply going to place this shape into your home page design — at bottom left — as a place holder for an animated banner you will create in a future lesson.
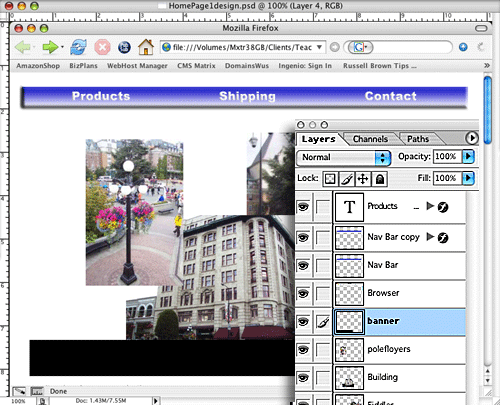
All three photos have been placed, and the banner placeholder was created, and placed into your document (see banner layer hilighted above). You will make your collage small enough so it does not interfere with this placeholder area, which could hold an advertising banner, or may simply be used for contact information, and bottom of the page links, etc.
4. Now work on your collage. Arrange the graphics you have selected to overlap in ways that look visually appealing. Use the Opacity setting and the Layer Blend modes in the Layer Palette to merge the graphics.
5. Add a soft edge effect to each image in your collage by first clicking on the image layer, then choosing the rectangular marquee tool. Set the border softness (tool options bar at top of screen) to approx. 12. Then, make a selection rectangle a small distance inside the graphic. You will see a rounded corner selection indicator – this is how Photoshop displays a selection with soft edges. Next choose Select Inverse, then strike the Delete key on your keyboard. You will leave a soft edge around an image using this technique.
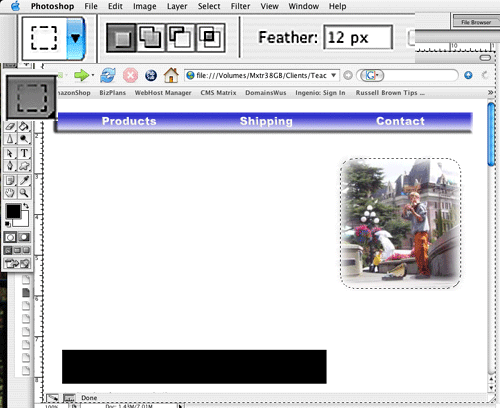

The top illustration above shows how the Rectangular Marquee tool has been used to select around the Fiddler with a 12 pixel “Feather” setting, which is displayed as a curved edge selection on screen. Then, Select Inverse was chosen before striking the delete key (it was struck 3 times to get an increasingly softer edge) so that just the outlying area of the image will be removed. The lower image shows one possible “collage” positioning of the three images in this Tutorial.
6. Save your finished collage as a separate graphic using the following method:
a) Make a duplicate of the current document.
b) Use the cropping tool to retain only the collage you created, then flatten the image.
c) Choose Save for Web.
d) Compare JPEG Quality options in the 4-UP tab. Your goal is to select the setting with the fastest download time (usually at 28.8 modem speed, because many 58k dial up services actually give you far slower connections), that also looks good without too much loss in picture resolution.
e) Pick your final selection by clicking on one of the four choices. The last square you click will have a black border around it and that one will be saved when you click the OK button.
This method is your technique to save anything you create in the mock-up document with the Browser layer to a separate graphic file so it may be reassembled into a web page with separate images. You should do this with the Navigation Bar, and the Banner, too.
NOTE: To practice saving your images organized for moving to a web hosting server, you save this image into your folder named “images” inside your “website” folder.
7. Save your Collage (using Save for Web) — remember to use a lower quality setting to gain a faster download time, then compensate for “artifacts” using Blur settings, as you learned in the first tutorial in this series. Shown below is quality level 60 with a .2 blur compensation setting.
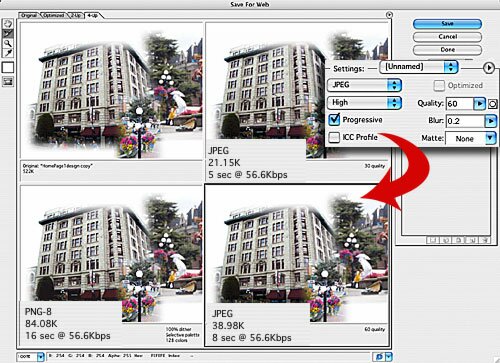
Above, three Save For Web options are examined (original is at upper left, then 3 other options are shown) for saving the collaged image. The bottom right version is chosen — JPEG, 60 Quality, Blur .2 — to deliver an image that downloads in 8 seconds on a 56k modem, without significant “artifacts” in the photo (remember to zoom in on the edge of the building to check for artifacts).
8. OPTIONAL ENHANCEMENT: If you have time, you might like to add a better sky to the building graphic by selecting the sky area, choosing a blue color, then use the Render:Clouds filter to add your clouds. Example shown above left included using Curves Adjustment to lighten the effect of the clouds.
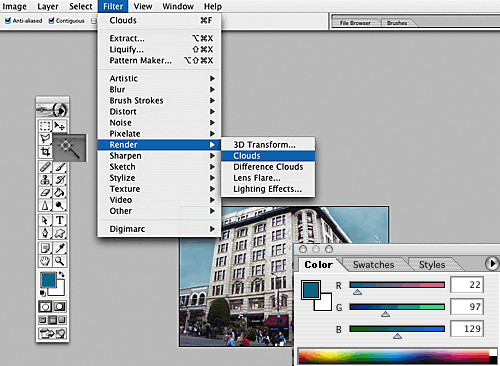
Above, you can see that the Magic Wand tool (enlarged) was first used to select the sky area at top left and right of building. This was done in the original image file of the building — not in the collaged page mock-up document. Then a foreground color of deep sky blue was chosen (see RGB color numbers in Color Palette at bottom right), and the background was changed to white. To get the cloudy sky effect, the Clouds filter was chosen on the Render pop-down menu, as shown. You may wish to then adjust the Contrast setting for the sky.
You can now add this new version of the building photo into your web page mock-up layout, and follow the same process to make it part of your collage.
Next Art For Web Tutorial: Creating a Seamless Background Tile