(In this lesson, you will use Photoshop to create a square tile that will repeat in the background of your web page without showing any edges where the tiles meet.)
1. Open Photoshop.
2. Open a new document that is 110 pixels wide by 110 pixels tall.
3. Select a color for your background using either the swatch palette or the color picker you get by clicking on the foreground color in the tool bar.
4. Choose add noise from the filter menu and set the filter at 20 to add a grain to your background.
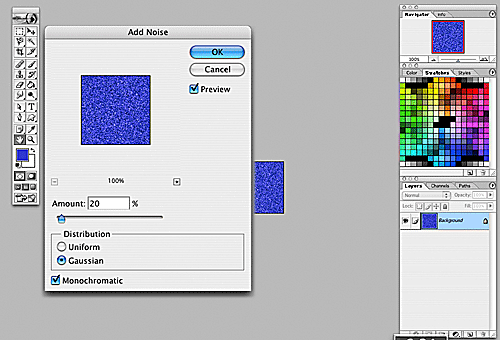
Above, the “Add Noise” filter is shown adding “noise” (random pixels of different intensities) to the blue square tile with 20% set for Amount, and the Gaussian radio button clicked. Monochromatic is also checked at bottom to keep the pixels within the blue range.
5. Now use the filter menu to select an Artistic filter to apply to your tile. Because you added noise in step 4, the filter will be able to rearrange the pixels –this would not work if the pixels were all the same exact color.
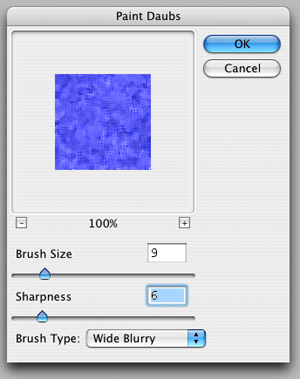
Above, the Artistic Filter, Paint Daubs, is shown being run on the tile after noise is added to get a more pleasing swatch of color with a painterly feel to it. Note the slider settings for Brush Size, and Sharpness, and also the pop-down choices for Brush Type. You can try our settings, or choose your own.
6. Next decide if you need to lighten the tile if you are going to have dark text appear over this background (you could use the opacity setting to lighten your tile). Conversely, you may wish to use Levels to darken the tile if you are going to use light or white text on your web page. Finish up and flatten the image.
NOTE: You will find you have quite a bit of control choices before you make the final adjustments to make your tile seamless — light or darken it, change its hue (color), run another filter… this is the fun part of being a web designer.
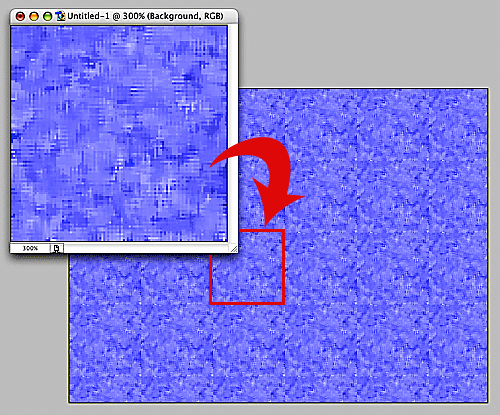
Suppose you skip the rest of the lesson, and just go ahead and use your new tile as a background in your website? The illustration above shows what would happen — your tile would be show obvious edges, detracting from your site design.
7. Now switch over to Image Ready by clicking the bottom right icon on the toolbar. You are going to use the “Tile Maker” filter that is only available in ImageReady. ImageReady is the companion program shipped with Photoshop and used mainly to create animations, roll overs, and image maps.
8. While in Image Ready, choose Filter:Other:Tile Maker. Check “Resize Tile to Fill Image”, and set width to 20 percent –click OK. Check to make sure that JPEG is the file type in the Optimization palette. Save the file as “Background1.jpg” and quit out of Image Ready, back to Photoshop.
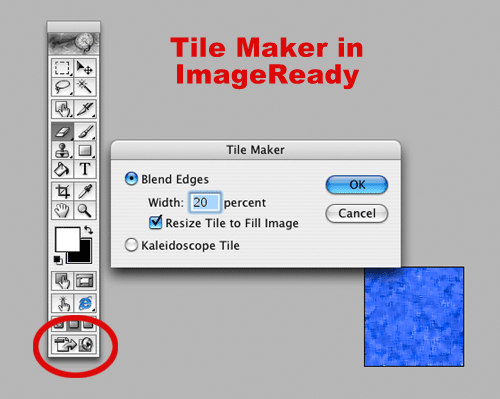
The above picture is actually in ImageReady (a companion program from Adobe) — not Photoshop, and shows the settings used with the Tile Maker filter. At the bottom of the ImageReady toolbar, the two buttons you use to switch back and forth between ImageReady, and Photoshop are shown.
NOTE: What about the Filter called “Pattern Maker” in Photoshop? My experience with this Filter (similar to that detailed in the book, the Photoshop Bible) is that the results are hit or miss — you might get a seamless tile, then again… you might not. Tile Maker in ImageReady produces seamless tiles much more consistently.
9. Test your new background tile in your HomePage1design.psd document (open it if it is not open), by first opening the file you just saved in Image Ready. Choose Select All, then Edit :Make Pattern and name it “VicBCTile1” to store it.
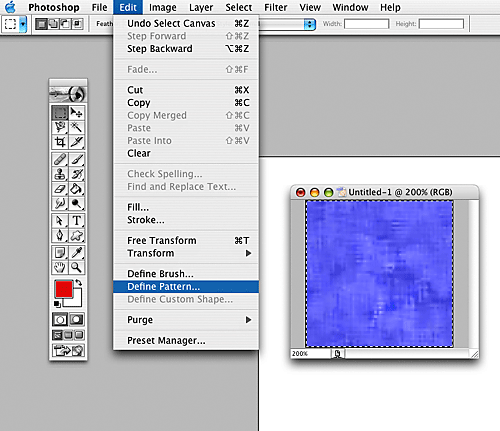
Above, the simple process of defining your new tile as a pattern is shown. You first choose Select All, then choose Define Pattern. That’s it. Your pattern shows up on your pattern list from the Fill command, or when you use the Paint Bucket in Pattern mode — see below.
10. Next, click on your HomePage document and create a new layer beneath your browser layer (we named it Blue Bkgnd in the illustration below). Finish by choosing Select All, then Fill from the Edit menu and Use Pattern — you will have to select the pattern you created in the previous step, which should be the last pattern in the pattern bank window.
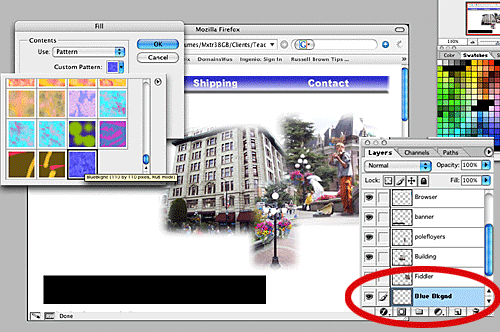
Above note that we first created a new layer beneath the other page element layers (circled in red). Then, with that layer selected (clicked on), we choose Fill, Use Pattern, which gives us a scrolling choice of patterns — our new one is the last in this set. Click on that new pattern and click OK.
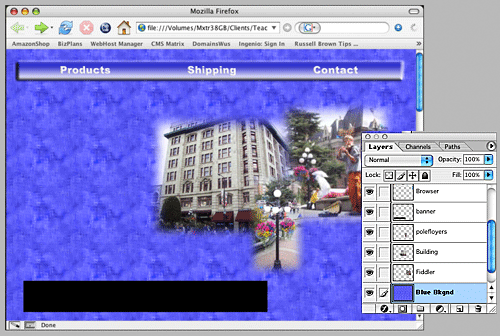
Above is the result of this lesson. Depending on how dark or light your tile is, you may need to adjust the colors of your other page elements. For example, the navigation bar could now look better in Red.
11. Save the document.
Next Art For Web Tutorial: Creating a left bar background in Photoshop