Learning CSS — Important CSS Concepts

This is an introductory article to some key concepts to help you when you as you learn CSS.
“Syntax” Helps You Understand the Code Structure of CSS…
Just as HTML must be written in a certain sequence and requires proper brackets around tags, precise spelling, and has its own Syntax, so does CSS. It is similar to HTML, but has its own variations (the brackets used are different, for example). Remembering the Syntax of CSS will guide you as you write your Style Sheets.
CSS Syntax Terms:
- Selector: A CSS element which may be an HTML tag, or a purely CSS command which you may modify by writing a Value for one or more of its Properties.
- Property: One of the attributes of a CSS element, like its background, margin, color, etc.
- Value: A size or color assigned to one of the properties of a CSS element.
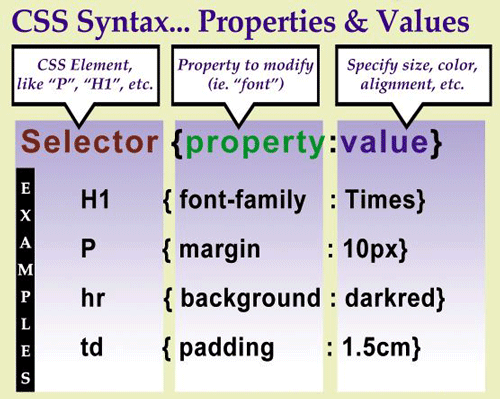
Note that CSS code uses its own bracket style — { and }, unlike HTML which uses < and >. Colons (:) go between properties and values.
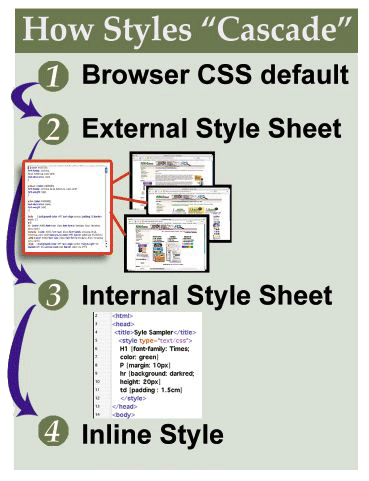 The “Cascading” of Style Sheets (that’s the C word in CSS), is an important concept that indicates the priority one form of Style takes over another. For example, an External Style Sheet trumps any styles that are set for the default in a browser like FireFox, Navigator, or Internet Explorer, while an Internal Style Sheet will over ride the External Sheet.
Types of Style Sheets — Some are More “Efficient”…
Style Sheets may be written and saved in an External document (recommended because it is more efficient — write once and control several HTML pages), or Internally, within an HTML document. If you have one CSS document, linked to by all pages in your website — an “External Style Sheet”, then when you make one change to, say, an H1 heading, every page will then show that change. Saves you time.
Styles can add many graphic effects to your web pages beyond what HTML can do — and as of this writing, the W3C.org (the standards body responsible for updates of HTML, and CSS among other things) is working on CSS3 which will add still more layout capabilities (some new features will include better text wrapping, justified text alignment, and a transparency/opacity option).
Style Sheets Give You Layout Controls not Available in HTML
See below how you can color and resize a horizontal rule using CSS, for just one example of what you can already do with current CSS scripting.
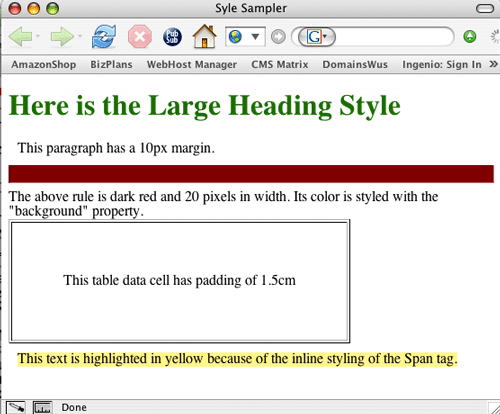
Above example shows the same example CSS items from the first illustration above — “CSS Syntax… Properties & Values,” as they look rendered in a browser.
Internal Style Sheets are placed in the Head section of your HTML document. Make sure you begin and end this Style Sheet with an opening and closing Style tag (not necessary in an external style sheet). Below is an illustration of such an Internal Style Sheet used to create the page shown in the last illustration. This method is still more efficient (takes less time and code), since you write it once in the Head section, then items in the Body of your HTML document pick up those characteristics (ie. you define the properties and values for H1 tags in your Internal Style Sheet, and all of your H1 headings take on those qualities).
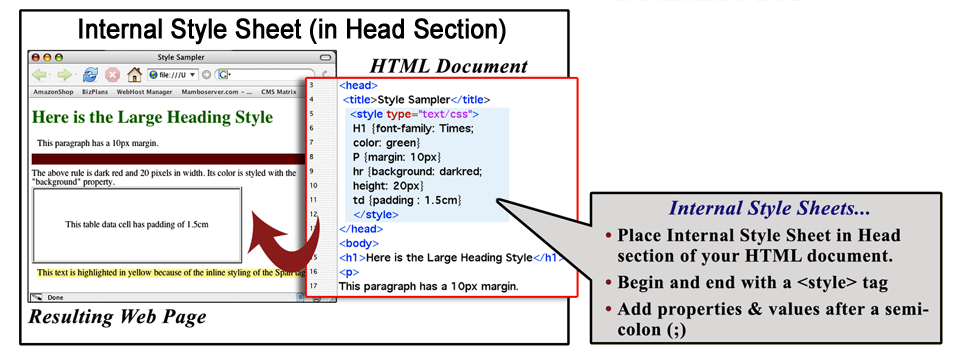
Note that whether you use an External or Internal StyleSheet, that you don’t have to start a new line of code when you want to give more that one Property and Value to any Selector, like a heading. As you can see above, both the color of the H1 heading, and the font are described in just one statement, by ending the first Property:Value (font-family: Times;) with a semi-colon (;), then writing the next Property and Value.
Below is a popular example of an “Inline Style” — where a style is scripted within an HTML tag. You can see how it looks in the illustration above (yellow hilighted text). While Inline Styles may be helpful for an occasional editing effect, their drawback is that you must make any changes to each and every page and occurrence where they are written — tedious work.
![]()
Key to flexing your CSS muscles is remembering the range of CSS Properties and Values available for modification in your site designs. Below, we present just a small set of popular examples. See below for resource websites where you may find longer lists.
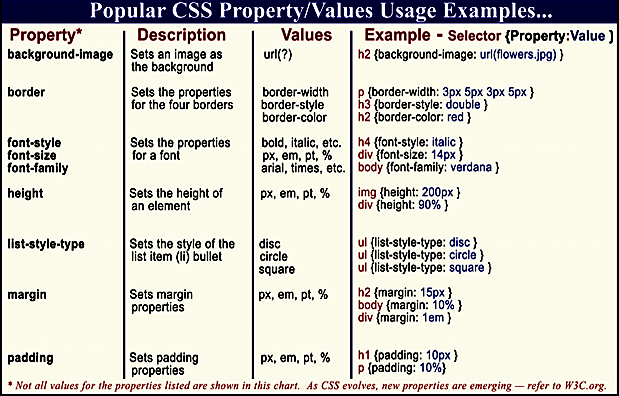
*Not all values for the properties listed are shown in table. **As CSS evolves, new properties are emerging — refer to the W3C.org site.
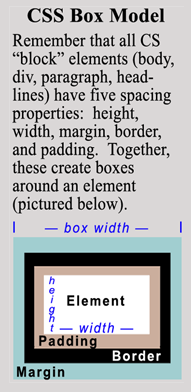
Understand the “Box Model” That Helps You Control Rectangular Areas in Your Designs…
The CSS “Box Model” is an important concept that explains how “Block Elements” like the body, div, paragraph, and table elements can have padding, borders, and margins applied to them.
As the illustration at right shows, padding sets the inward space, while margins set the outward space, and borders are set on the dividing line padding ends and margins begin. It may seem odd to think about this concept at first, but you must exercise your brain this way as a Style Sheet designer so that your page elements, and space around and within them, make sense to you. One good example is that we needed padding around the illustration at right (WordPress, the blog software we use here would not accept the HTML “hspace” code). So, we used an inline style to define 10 pixels of padding around the illustration, enlarging the “box” area with 10 pixels of blank space.
by Scott Frangos